I wanted to build a WhatsApp ChatBot
How I built a 24/7 WhatsApp chatbot on a Raspberry Pi Zero using WAHA, FreeLLMAPI, and a transport-agnostic framework called Kai.
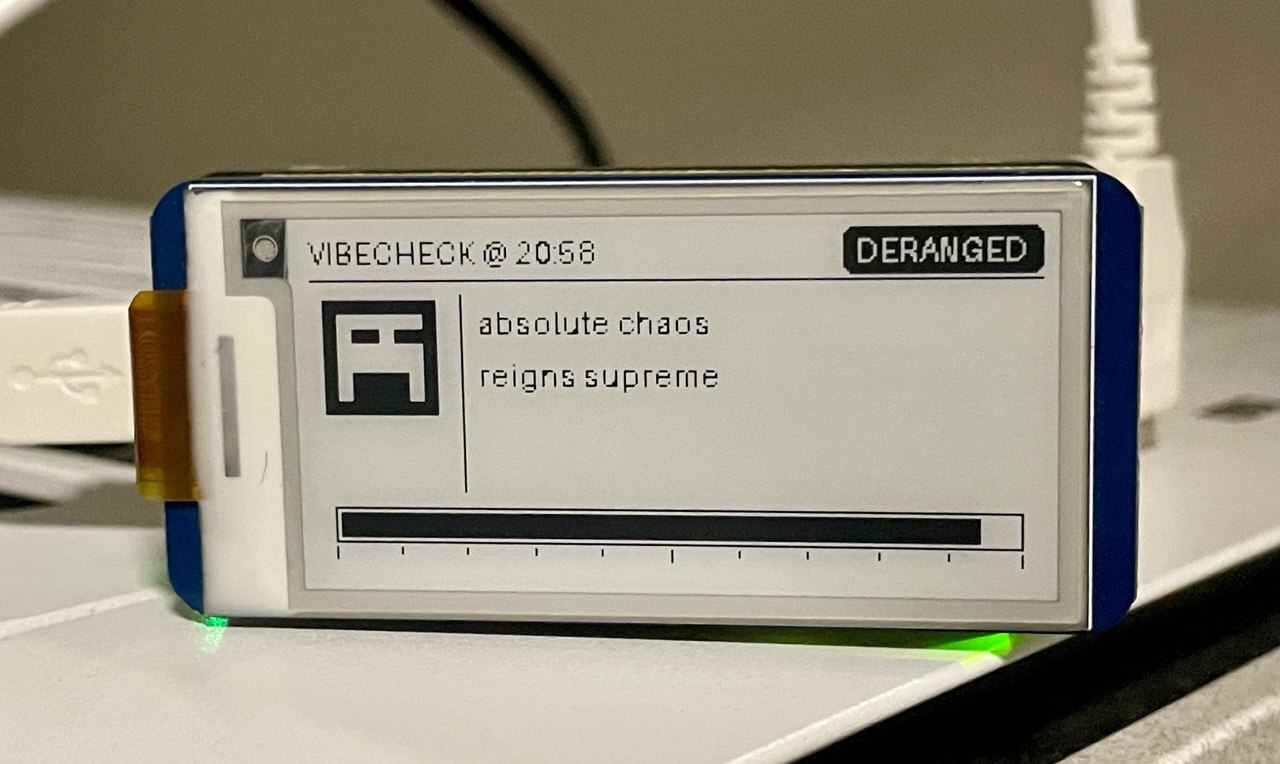
Do not ask me why, but a few years ago I built a pwnagotchi using a Raspberry Pi Zero, a UPS-Lite battery, and an E-Ink Display HAT. It was highly enjoyable and helped me learn more about embedded systems. However, like many weekend projects, the hardware was simply left unused after fulfilling its initial purpose.
I have increasingly been exploring the development of agents and tools for agents. With the release of Gemma 4, Google has genuinely impressed me. Although the model occasionally produces hallucinations, I consider it a very competent model for simple agents and one that demonstrates strong writing capabilities. Consequently, one Friday evening, I resolved to create something capable of running on a Raspberry Pi. Why not build a WhatsApp bot, connect it to a WhatsApp group, and let it assist in summarizing conversations, retrieving information from the internet, or serving as a fact-checker when people get into interminable debates? All I’d need is LlamaIndex and WAHA, and it would be done. Simple, right?
Well, not quite.
The problems
Many obstacles arose, but I had already made up my mind and was determined not to give up. The doubts I had to work through included:
- How to communicate with WhatsApp
- How the bot could maintain a “memory” to respond in context
- What types of input the bot should support: text, images, or audio
The most interesting aspect of this project was that I got to think critically, make trade-offs, learn extensively, and I also enjoyed reading the messages.
Talking to WhatsApp
This was the easiest problem to solve because I had already tested several tools before. The truth is that many WhatsApp CLIs out there are very unstable — they work, but inconsistently — so the only stable solution is to take the long path. I found WAHA to be the only true solution for integrating with WhatsApp. The installation requires a few steps, but it is worth it. I ended up using the following docker compose file:
services:
  redis:
    image: redis
    container_name: redis
    hostname: redis
    restart: unless-stopped
    volumes:
      - cache:/data
  waha:
    image: devlikeapro/waha
    container_name: waha
    hostname: waha
    restart: unless-stopped
    ports:
      - 8603:3000
    environment:
      TZ: ${TZ}
      REDIS_URL: ${REDIS_URL}
      WAHA_API_KEY: ${WAHA_API_KEY}
      WAHA_API_KEY_PLAIN: ${WAHA_API_KEY}
      WAHA_DASHBOARD_USERNAME: ${WAHA_DASHBOARD_USERNAME}
      WAHA_DASHBOARD_PASSWORD: ${WAHA_DASHBOARD_PASSWORD}
      WHATSAPP_SWAGGER_USERNAME: ${WHATSAPP_SWAGGER_USERNAME}
      WHATSAPP_SWAGGER_PASSWORD: ${WHATSAPP_SWAGGER_PASSWORD}
      WAHA_DASHBOARD_ENABLED: ${WAHA_DASHBOARD_ENABLED}
      WHATSAPP_SWAGGER_ENABLED: ${WHATSAPP_SWAGGER_ENABLED}
      WHATSAPP_DEFAULT_ENGINE: ${WHATSAPP_DEFAULT_ENGINE}
      WAHA_NAMESPACE: ${WAHA_NAMESPACE}
      WAHA_BASE_URL: ${WAHA_BASE_URL}
      WAHA_LOG_FORMAT: ${WAHA_LOG_FORMAT}
      WAHA_LOG_LEVEL: ${WAHA_LOG_LEVEL}
      WAHA_PRINT_QR: ${WAHA_PRINT_QR}
      WAHA_MEDIA_STORAGE: ${WAHA_MEDIA_STORAGE}
      WHATSAPP_FILES_LIFETIME: ${WHATSAPP_FILES_LIFETIME}
      WHATSAPP_FILES_FOLDER: ${WHATSAPP_FILES_FOLDER}
      WHATSAPP_API_SCHEMA: ${WHATSAPP_API_SCHEMA}
      WHATSAPP_API_HOSTNAME: ${WHATSAPP_API_HOSTNAME}
      WHATSAPP_API_PORT: ${WHATSAPP_API_PORT}
      WAHA_APPS_ENABLED: ${WAHA_APPS_ENABLED}
    volumes:
      - ${DATA_FOLDER}/waha:/app/.sessions
    depends_on:
      - redis
I know there are many environment vars, but here is the .env file:
TZ=
WAHA_API_KEY=
WAHA_DASHBOARD_USERNAME=admin
WAHA_DASHBOARD_PASSWORD=
WHATSAPP_SWAGGER_USERNAME=admin
WHATSAPP_SWAGGER_PASSWORD=
WAHA_DASHBOARD_ENABLED=True
WHATSAPP_SWAGGER_ENABLED=True
WHATSAPP_DEFAULT_ENGINE=WEBJS
WAHA_NAMESPACE=all
WAHA_BASE_URL=
WAHA_LOG_FORMAT=JSON
WAHA_LOG_LEVEL=debug
WAHA_PRINT_QR=False
WAHA_MEDIA_STORAGE=LOCAL
WHATSAPP_FILES_LIFETIME=0
WHATSAPP_FILES_FOLDER=/app/.media
WHATSAPP_API_SCHEMA=http
WHATSAPP_API_PORT=3000
WHATSAPP_API_HOSTNAME=
WAHA_APPS_ENABLED=True
REDIS_URL=redis://:redis@redis:6379
DATA_FOLDER=/home/it/docker/data
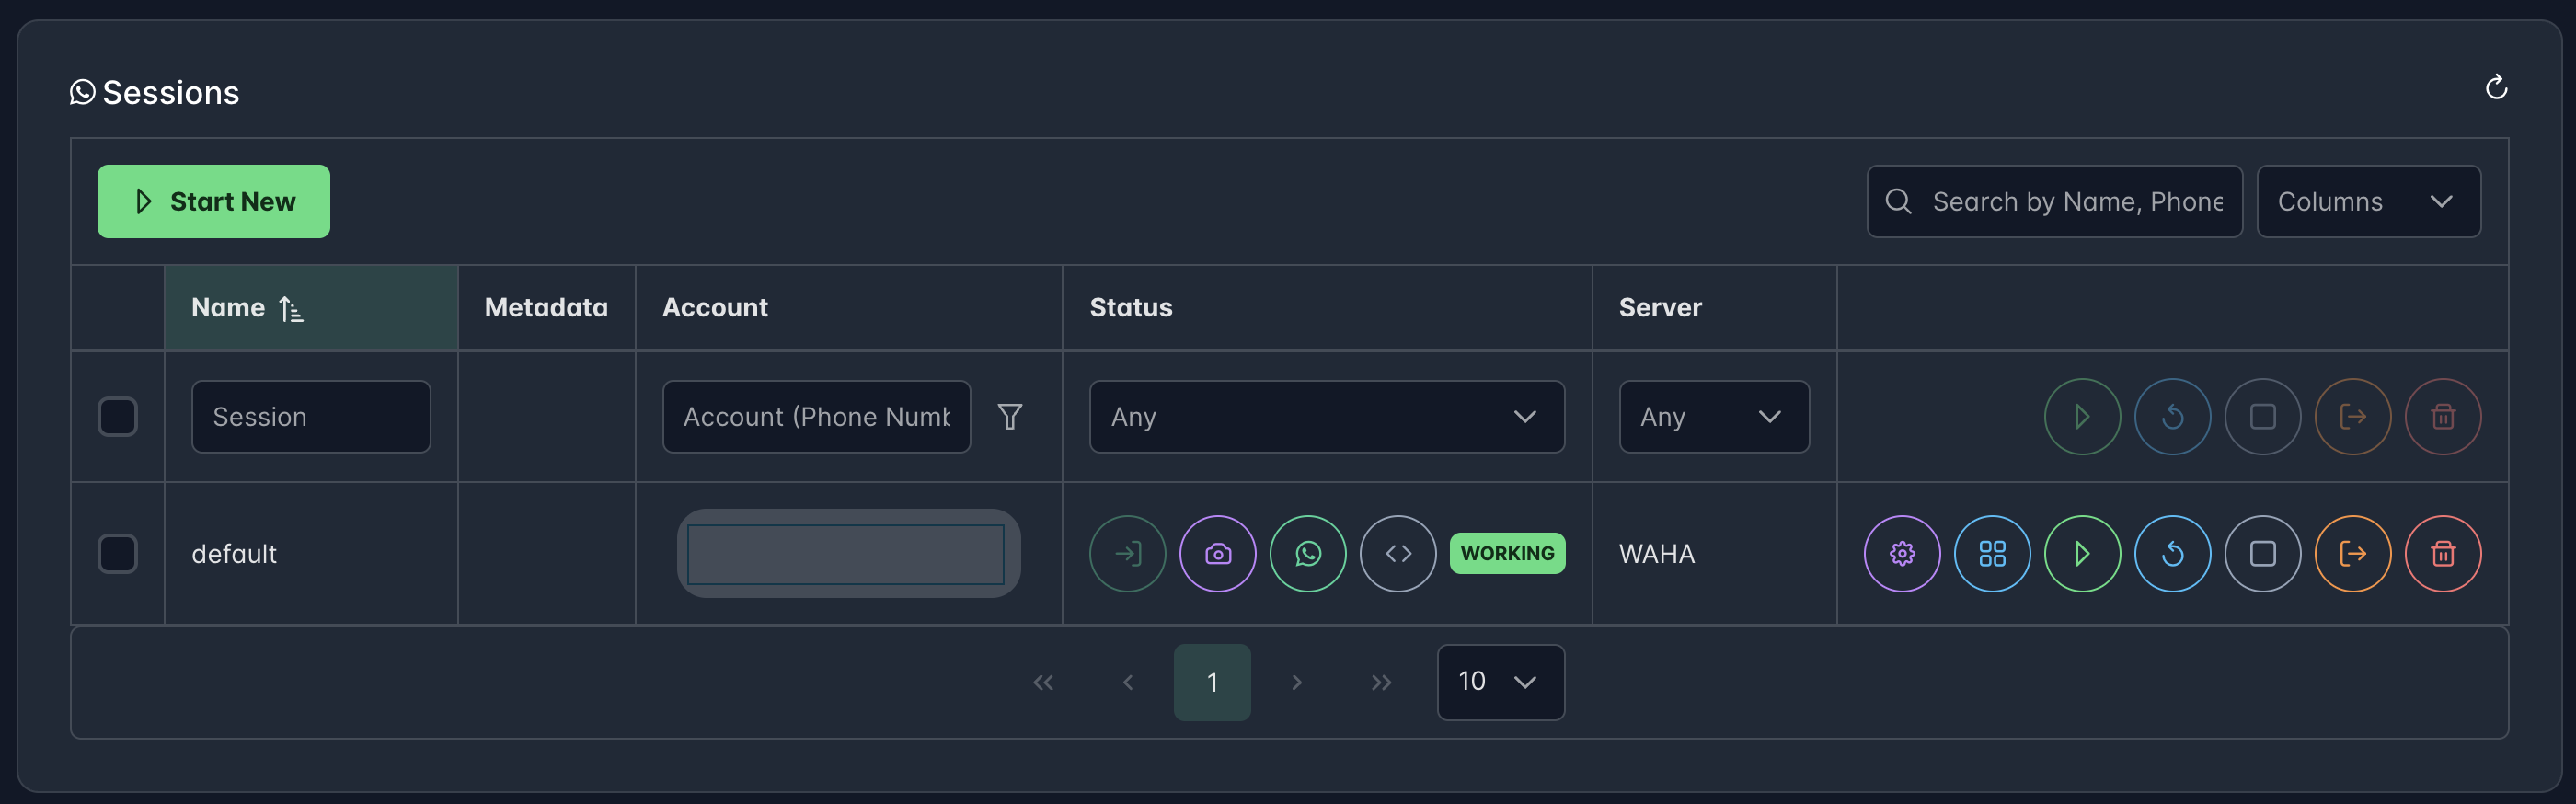
After configuring the session, everything worked very well: stable and fast.
Running it for free
I operate my own local AI inference server and may write a blog post about it in the future. I have two rigs: the “old rig” with 48GB of VRAM using 2x RTX A5000, and the “new rig” with 64GB of VRAM using an RTX PRO 4500 Blackwell. Since NVFP4 performs very well, I no longer use the old rig. However, I am still reluctant to keep any rig running continuously, as it is not cheap; while not prohibitively expensive, we strive to minimize energy consumption at home. Therefore, I needed to connect the bot to an OpenAI-compatible API for free.
Meet FreeLLMAPI. FreeLLMAPI is an OpenAI-compatible proxy that stacks the free tiers of the LLM providers behind one /v1 endpoint. Beautiful — so, let’s go! But wait, where am I going to run FreeLLMAPI? The Raspberry Pi Zero W is already very limited. Well, why not on another Pi? :)
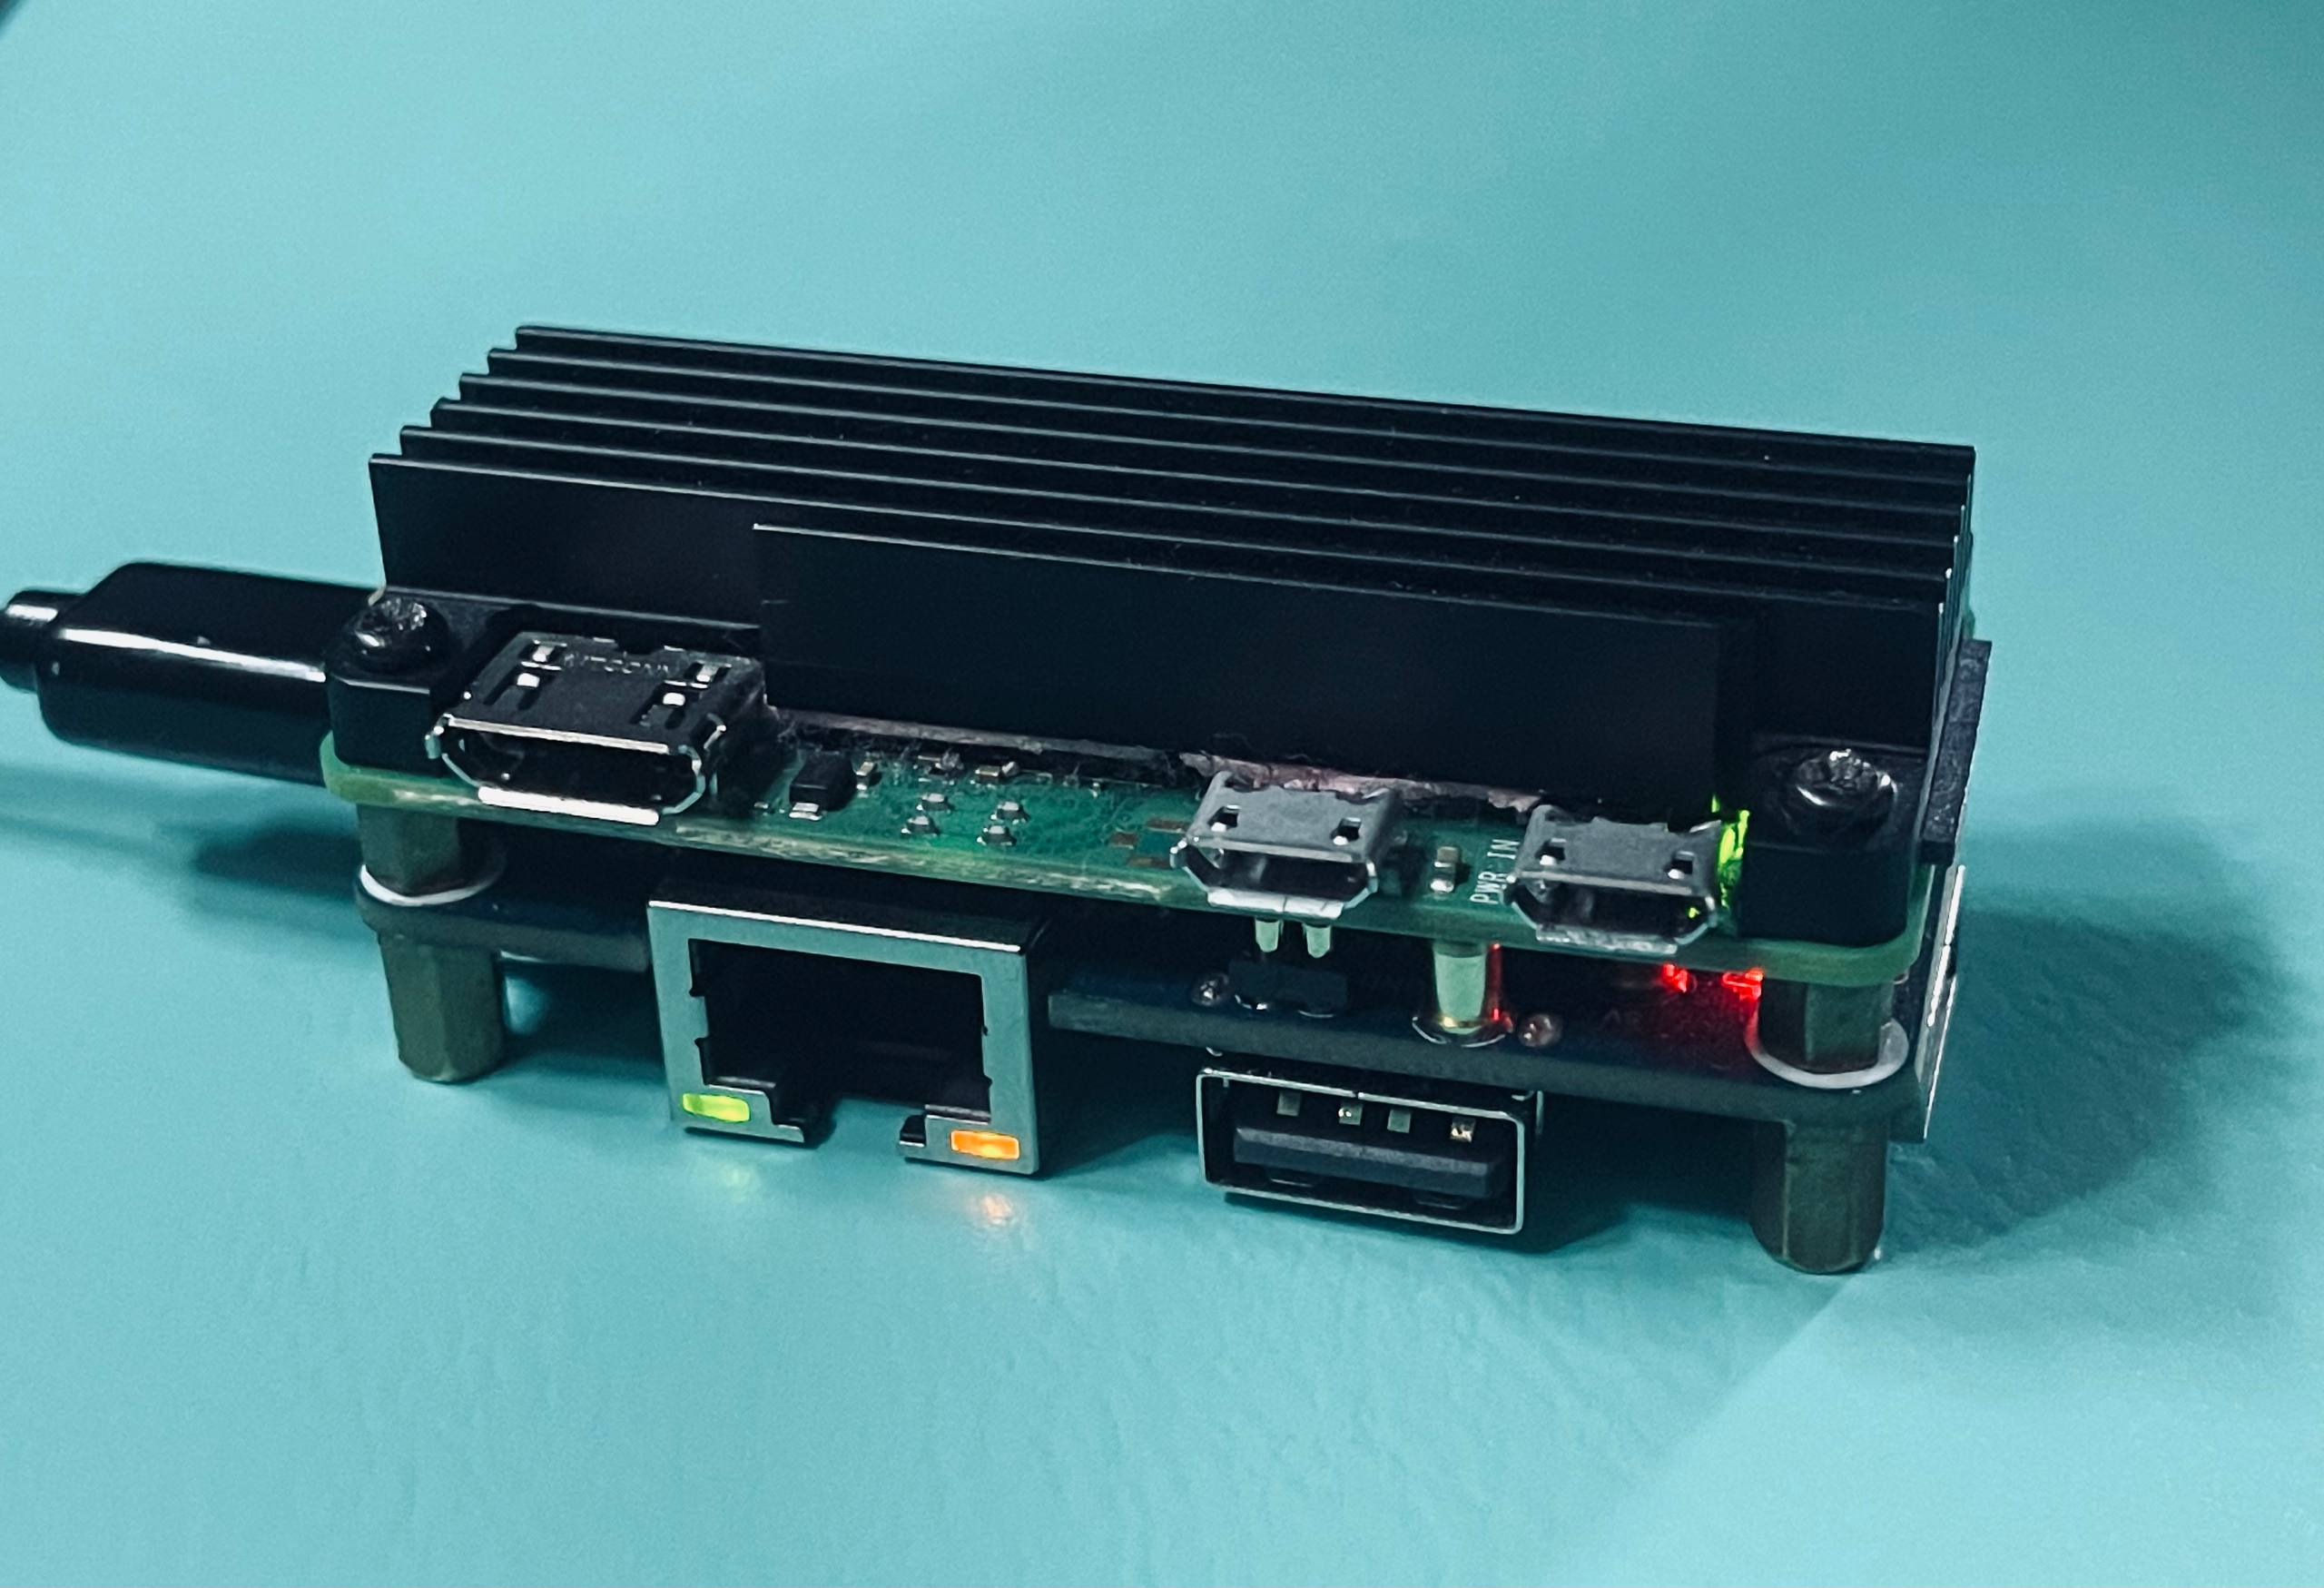
While looking for the pwnagotchi, I found another Zero — but this was actually a Zero 2, which has a quad-core Arm Cortex-A53, or simply an Armv8 architecture. I flashed DietPi onto an SD card and I was ready to go. DietPi is an extremely lightweight Debian OS, highly optimised for minimal CPU and RAM resource usage. After installing Docker using the dietpi-software command, I installed FreeLLMAPI with a simple command:
curl -fsSL https://freellmapi.co/install.sh | bash
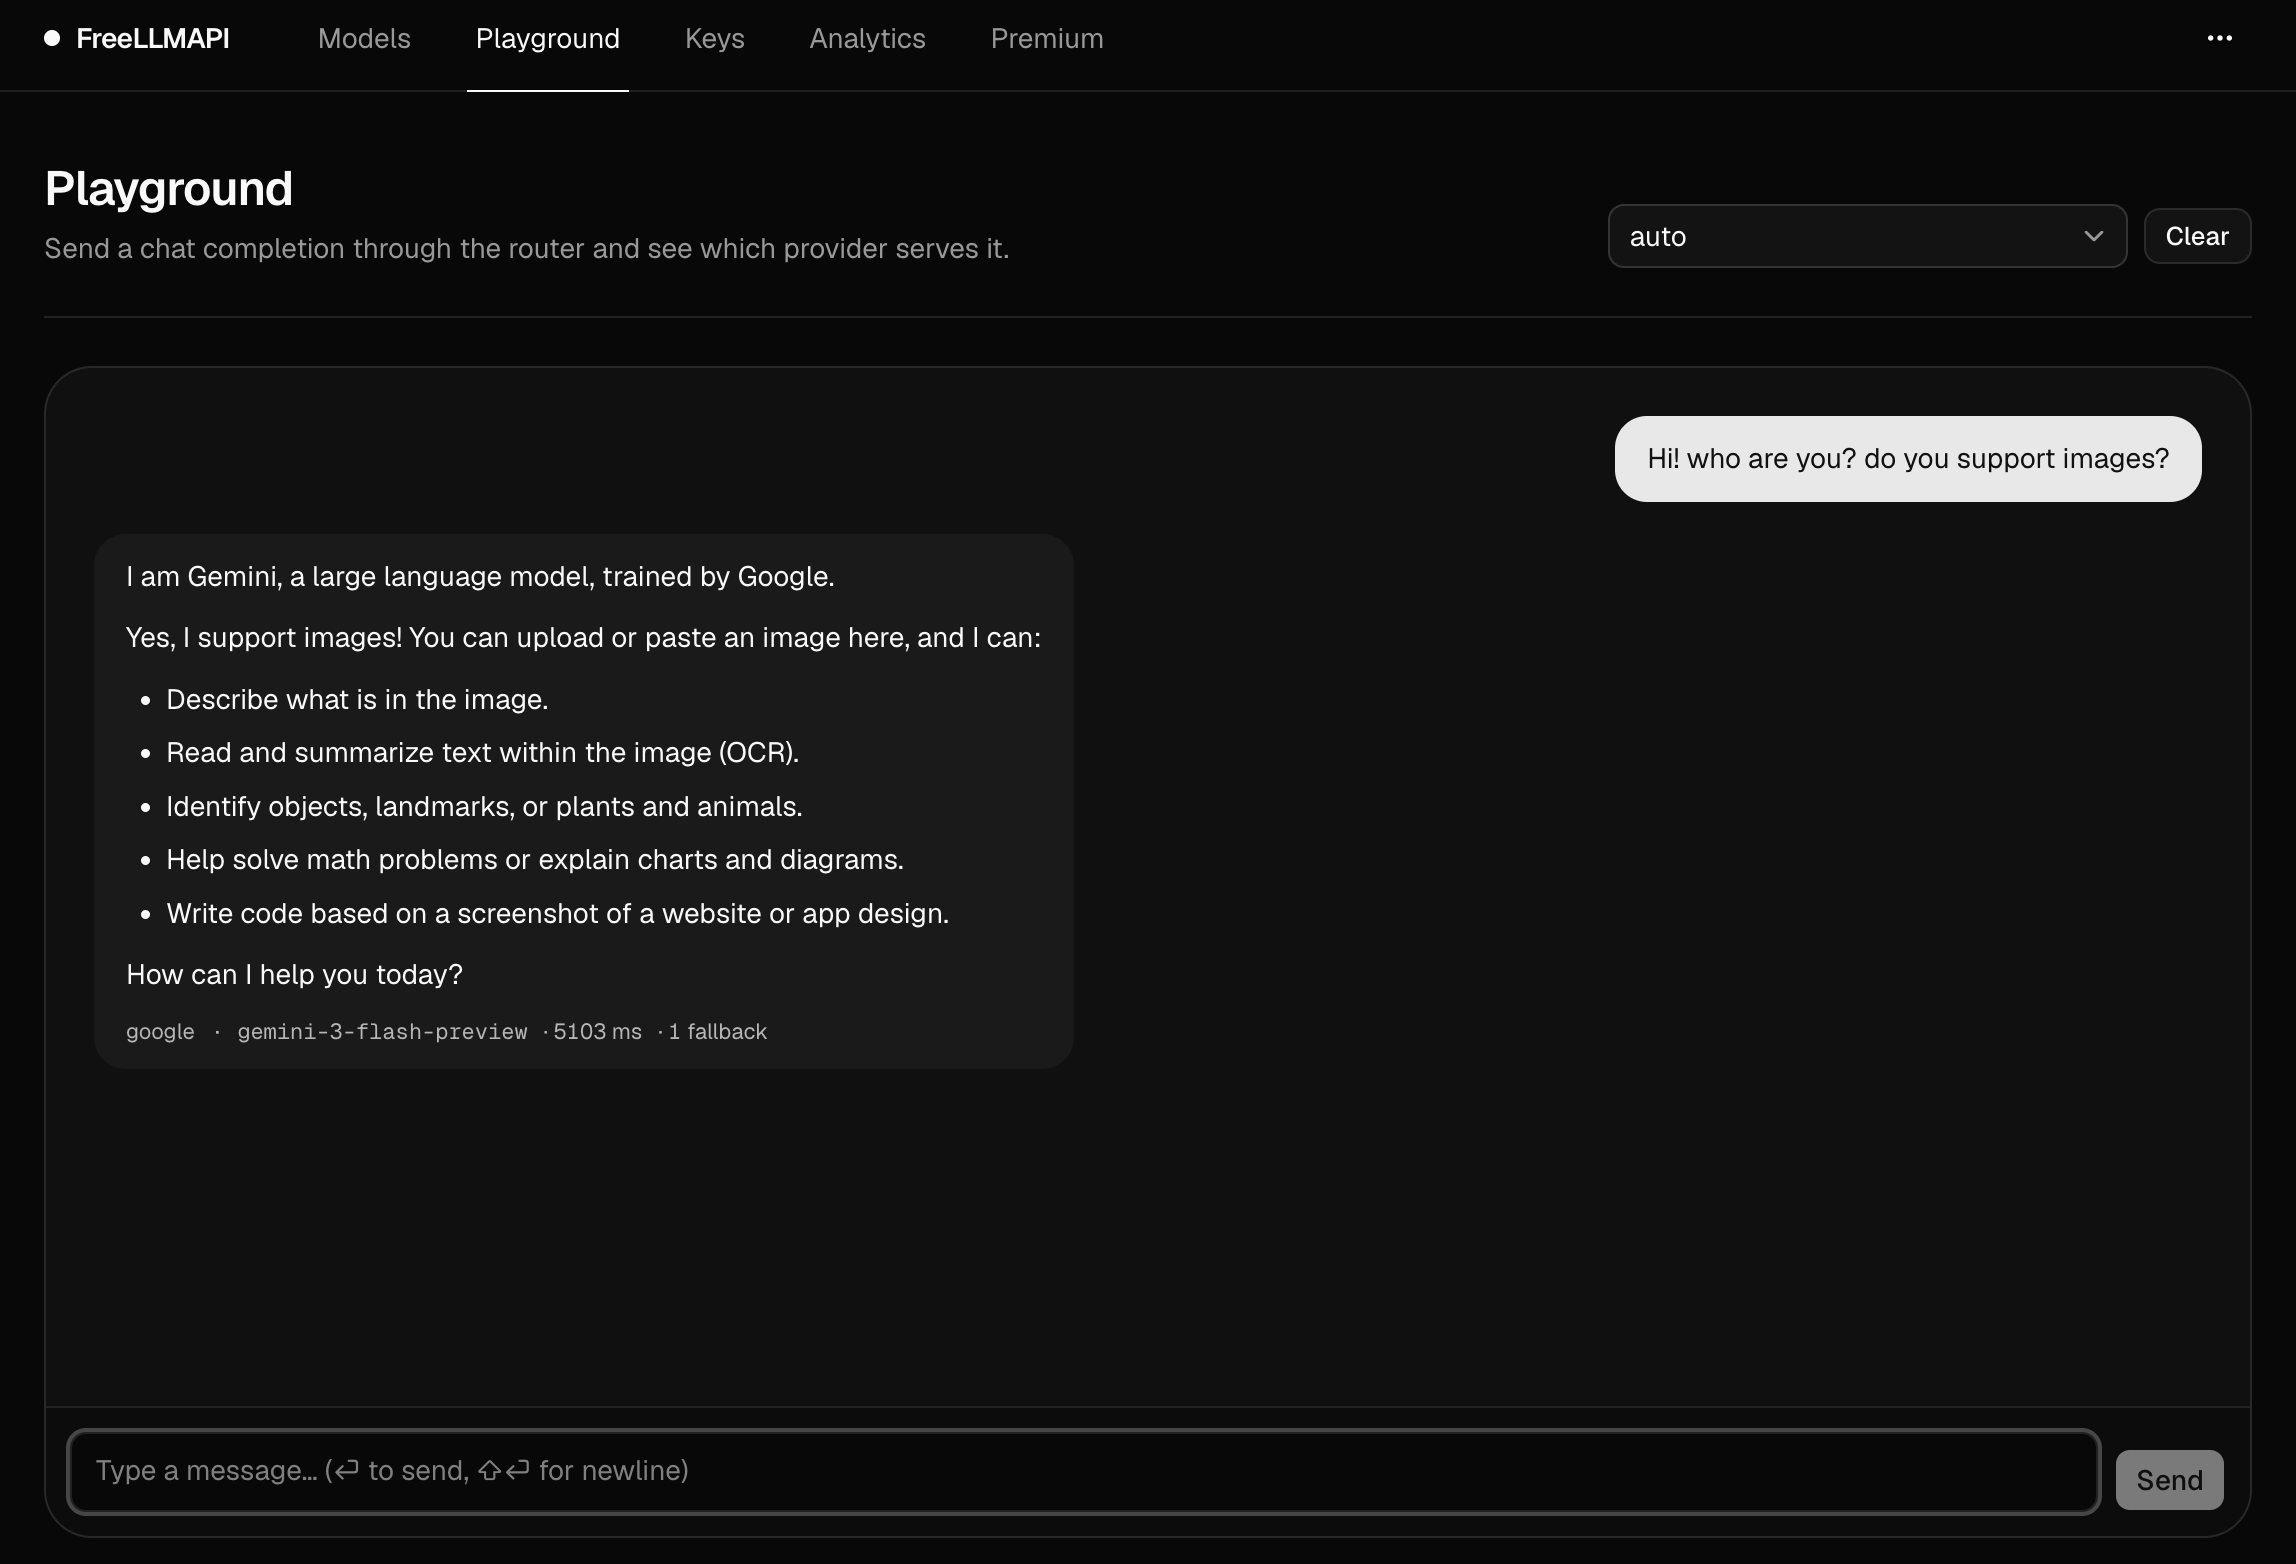
Then I changed the HOST_BIND variable to 0.0.0.0 inside the .env file to expose the service. After installing FreeLLMAPI, setting up the providers, and the routing strategy, everything seemed to be working just fine:
Running it 24/7
Now I needed to build a home for the bot to run uninterrupted. I flashed DietPi again for the Raspberry Pi Zero and started working. DietPi is based on Debian, meaning I can install pretty much any package, but the only problem is that the Pi Zero has an Armv7, which is 32-bit. I had to be very careful, and the dependencies had to be very standard. After a few rounds, I finally managed to compile the list of dependencies that can be installed via apt:
sudo apt install -y \
    build-essential gcc g++ gfortran \
    python3-dev pkg-config cmake \
    git swig autoconf automake libtool \
    libjpeg-dev zlib1g-dev libfreetype6-dev libopenjp2-7-dev \
    libopenblas-dev liblapack-dev \
    libxml2-dev libxslt-dev libssl-dev \
    liblgpio-dev \
    rustup \
    zip unzip fastfetch
Some of the Python dependencies pulled in by uv sync ship as source distributions that need to compile native code, and a few of them require a working Rust toolchain. I first tried the Debian-packaged rustc and cargo, but they were too old for what those packages expected, so the build kept failing. rustup is the official Rust installer and version manager; once it is on the system, running rustup update stable fetches a recent, self-contained stable toolchain (which ships its own rustc and cargo in ~/.cargo/bin) and shadows the distro versions. After that, the uv sync builds finally went through.
To install the latest Rust toolchain:
rustup update stable
Perfect. Now I have an excuse to use old code I wrote before.
Meet Kai
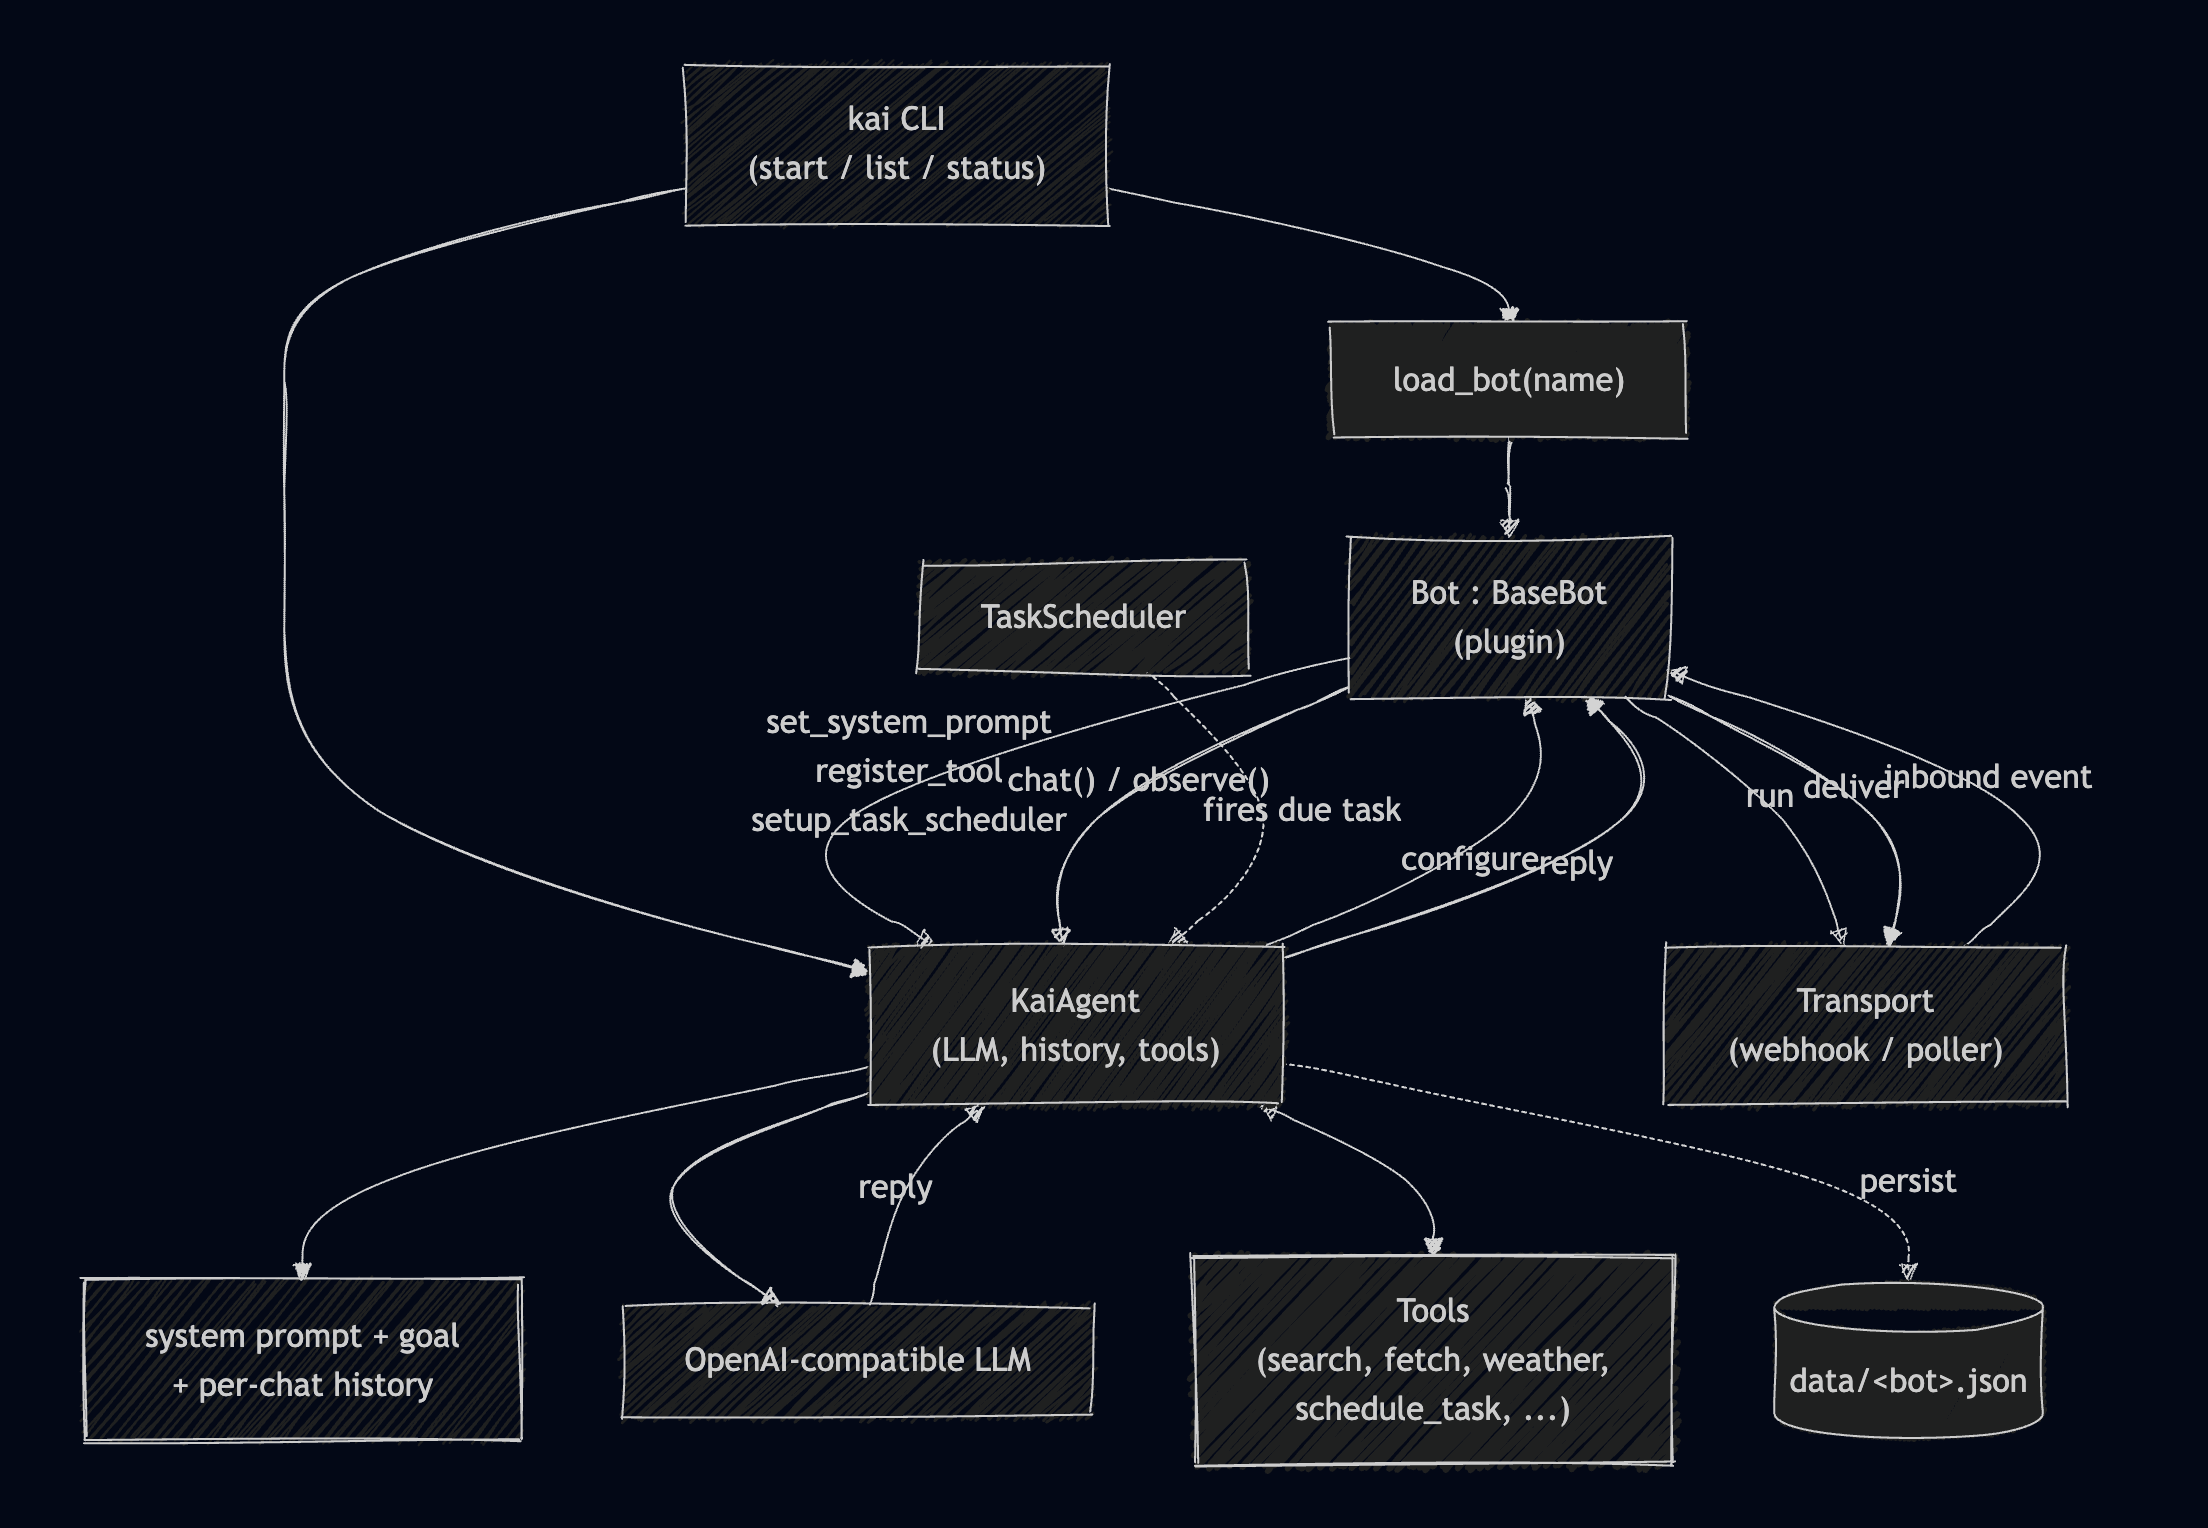
Kai is a small framework I’d written previously for exactly this kind of thing. The Kai framework. At its core, Kai is a transport-agnostic runtime that cleanly separates where messages come from from how they’re answered. The kai CLI boots a bot plugin and a KaiAgent — the agent owns the LLM connection, per-conversation history, the tool slate, and a scheduled-task engine, while the bot owns the persona and the transport. They meet through a single handshake: configure() lets the bot set its system prompt, register tools, and wire its scheduler, after which run() starts the transport and begins funneling inbound events into just two calls — agent.chat() to produce a reply, or agent.observe() to absorb context silently. Everything below that line is identical for every bot: assemble the prompt, goal, and history, let the LLM call tools in a loop, persist the conversation to its own file, and hand the reply back. Because the core never knows whether the events came from WhatsApp, email, or a Docker alert stream, adding a new integration means writing a small plugin, not reinventing the runtime.
The key here is being transport-agnostic: it means a bot can be hooked into almost anything — WhatsApp, email, a Docker alert stream — without rethinking the core. Anyone who has written agents to connect to services knows the pain of relying on buggy third-party tools, or worse, having to build the integration from scratch.
Now I can finally write a simple bot to interact with WhatsApp. WAHA comes with webhook support out of the box.
The actual Bot
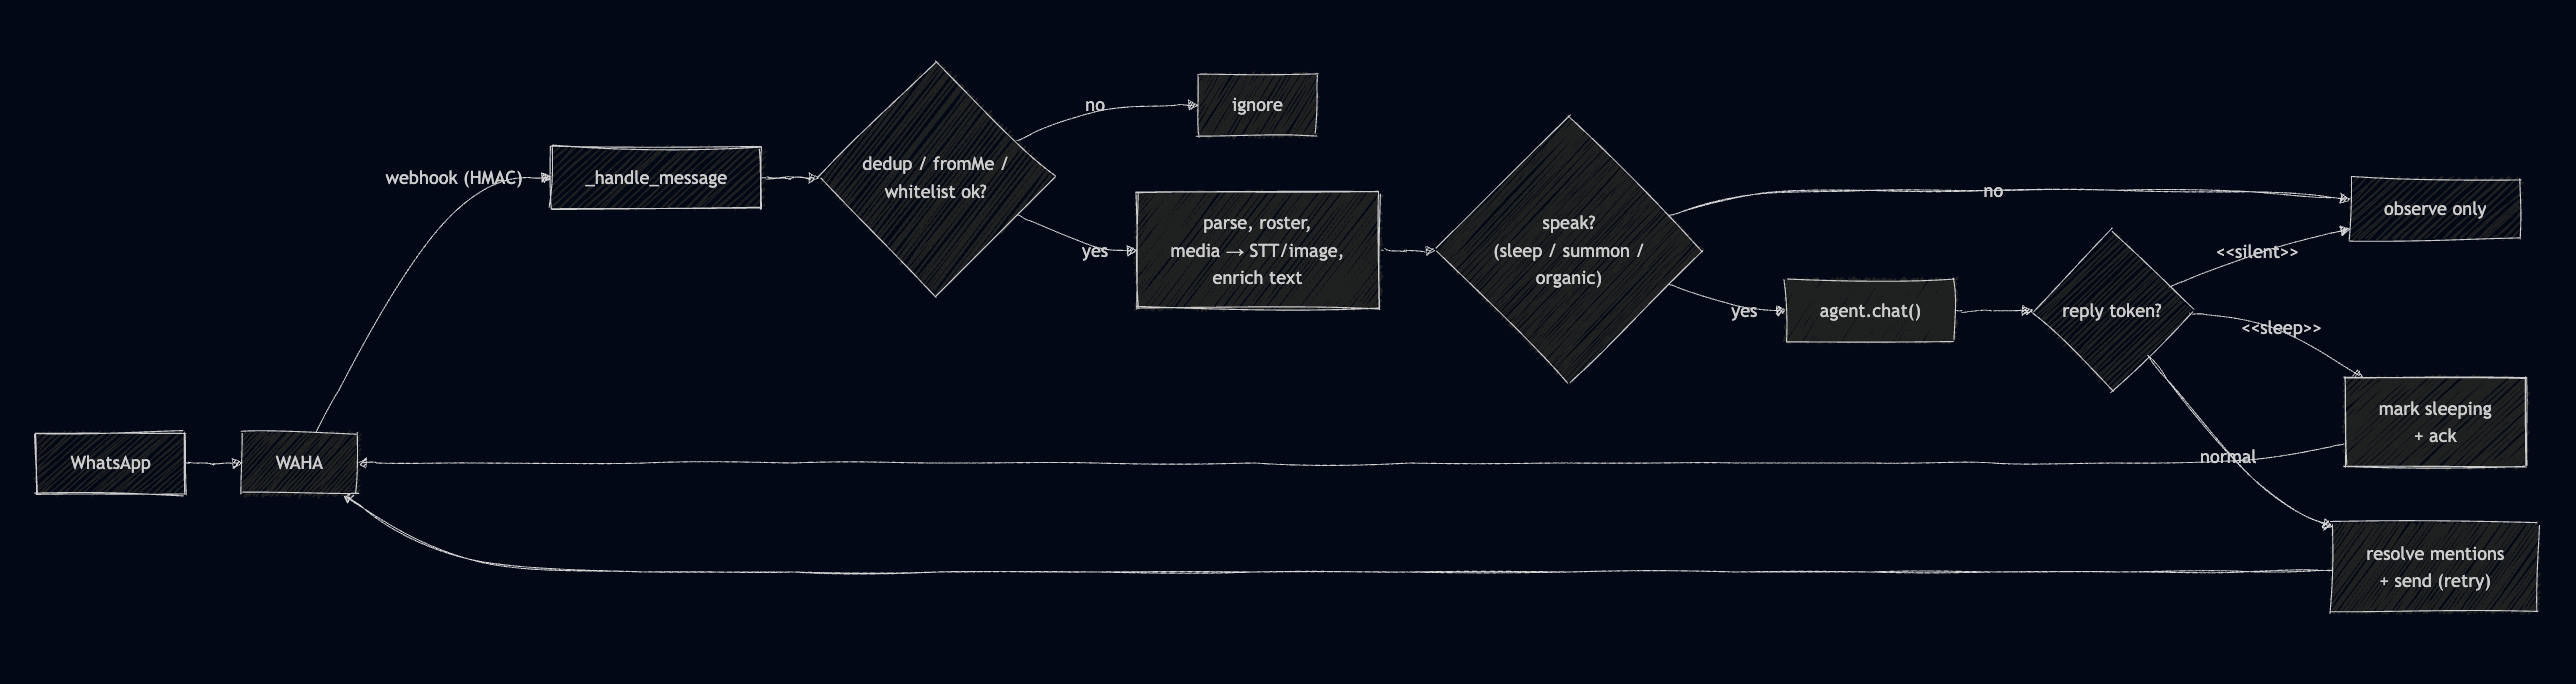
The bot is the concrete proof of that design — a WhatsApp participant built entirely as a plugin over the shared runtime. Messages arrive from WhatsApp through WAHA into an HMAC-verified webhook, and from there most of the bot’s work is deciding whether to speak at all. It first drops anything noisy or unsafe — duplicate deliveries, its own messages, and senders outside the whitelist — then enriches what remains by updating the chat roster, transcribing voice notes, and folding in reply context.
The surviving message runs a gauntlet of participation logic: is the bot asleep in this chat, was it directly summoned by name or mention, or should it organically chime in within its rate, cooldown, and streak limits? Only when one of those says “yes” does it actually call agent.chat(). The reply is then read for control tokens — <<silent>> to stay quiet, <<sleep>> to go dormant, or a normal message that gets its @mentions resolved and is sent back through WAHA with retries. The result feels like a natural group member, but underneath it’s the same agent.chat() every Kai bot calls, wrapped in WhatsApp-specific etiquette.
Pretty much something like the next.
Nice — but something is still missing.
Hearing: voice notes with ffmpeg + whisper
A lot of WhatsApp traffic isn’t text — it’s voice notes, and a bot that ignores them feels half-deaf. So when voice is enabled, the WAHA bot transcribes audio locally, with no external API calls and nothing leaving the machine. The catch is that WhatsApp voice notes arrive as compressed audio (typically OGG/Opus), which speech models don’t ingest directly, and whisper.cpp specifically wants 16 kHz mono PCM WAV. That’s the two-tool split: ffmpeg is the universal converter that normalizes whatever WhatsApp sends into exactly that WAV format (-ar 16000 -ac 1), and whisper.cpp — a lightweight C++ port of OpenAI’s Whisper that runs on CPU with no Python or GPU dependency — does the actual speech-to-text against a bundled model file. Each clip is written to a scratch dir under /tmp/kai/media, run through ffmpeg, then through whisper, and the resulting text is folded back into the message as a [voice note: …] tag so the agent treats it just like any other text turn.
Kai ships this as pre-built binaries in vendor/ (installed via scripts/setup_media.sh), so there’s no compiling, no cmake, and no cloud transcription bill. There are two modes behind one interface: a simple CLI mode that spawns whisper.cpp per clip, and a server mode that keeps a whisper-server process warm and POSTs audio to its /inference endpoint — faster under load because the model stays loaded in memory. If ffmpeg or the model is missing, it degrades gracefully to a no-op rather than crashing.

Great — but still, something else is missing.
Seeing: images with native multimodal
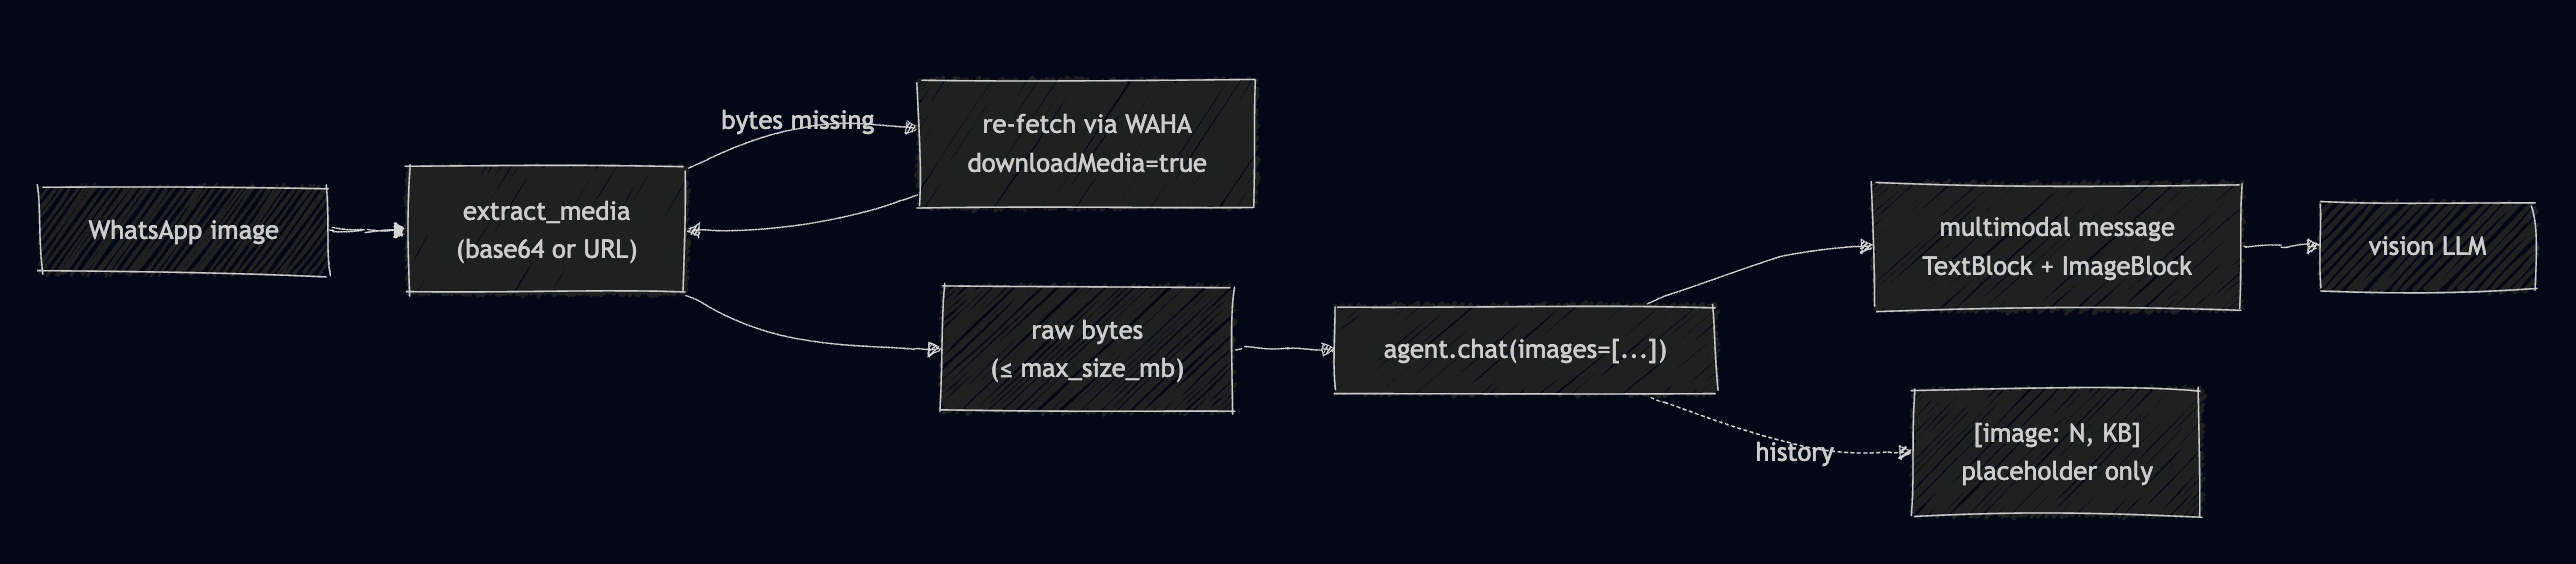
Images are the easier sibling of voice notes — there’s no format-conversion dance, because modern vision-capable LLMs accept image bytes directly. When a WhatsApp image arrives, the bot’s extract_media step pulls out the picture: WAHA sometimes inlines it as base64 in the webhook and sometimes only sends a reference, so if the bytes aren’t present the bot re-fetches the message from WAHA’s REST API with downloadMedia=true and grabs the file URL. The raw bytes (capped by a configurable max_size_mb) are then handed straight to agent.chat() as an images=[...] argument.
Inside the agent, the user turn is built as a multimodal message — a TextBlock for the caption alongside one ImageBlock per picture — and sent to the LLM, which “sees” the image and reasons about it in the same reply it writes. The only special handling is on the history side: storing full image bytes in every conversation file would bloat them instantly, so the agent never persists the pixels — it writes a compact [image: 1 image(s), 240 KB] placeholder instead. The image influences the live reply, but the saved transcript stays text-only and lightweight. As with voice, the whole feature is gated by config (media.image_enabled); turn it off and images are simply ignored.
Now all good. I was ready to put my assumptions all together, and…
It worked!
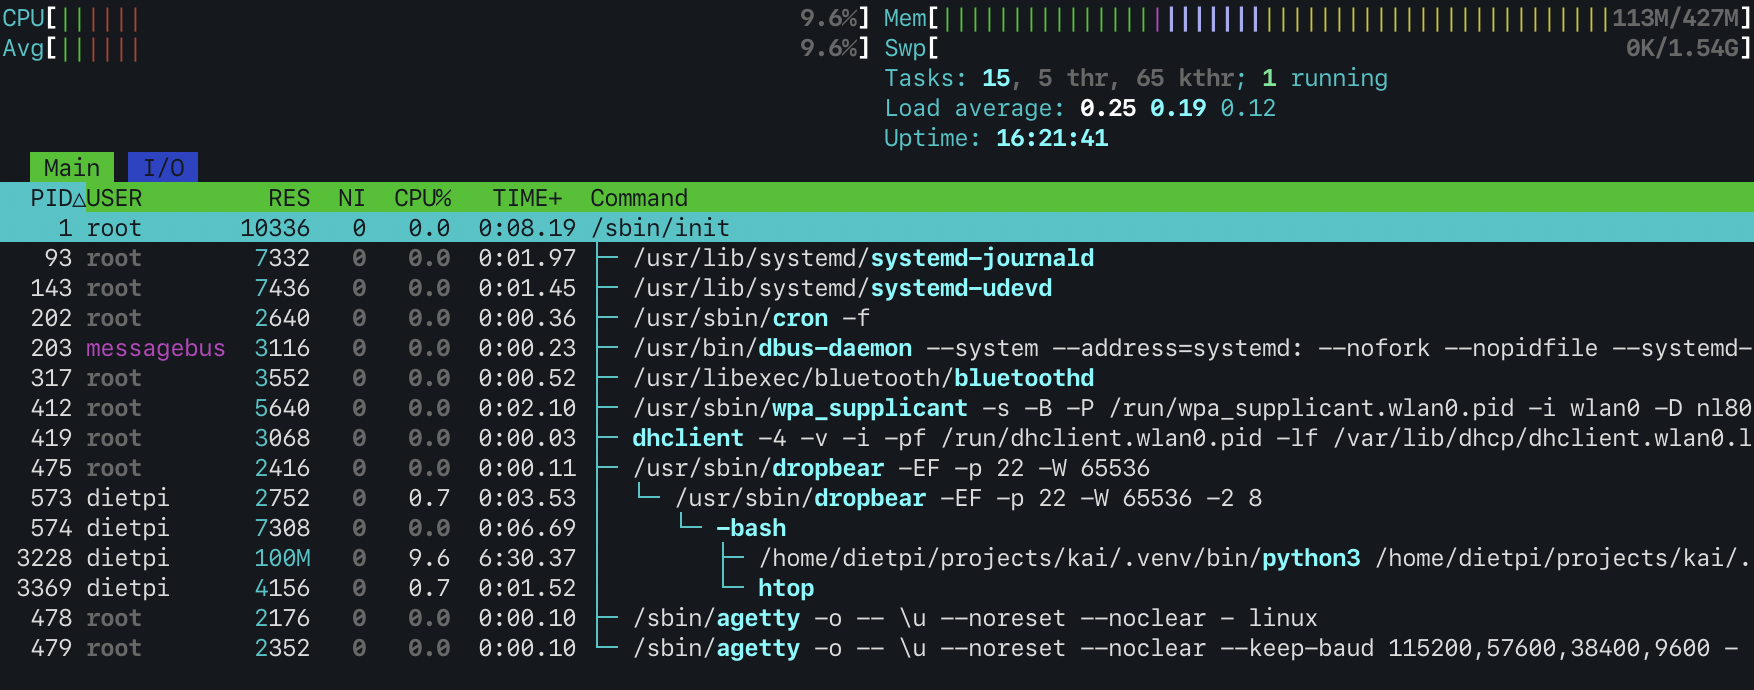
Yes, it worked, and I’m not going to pretend I was surprised, because I was not. I’ve been running my homelab for a while, experimenting with hardware and managing resources. Compiling numpy on the Pi took a while — pretty much hours — but it went through without problems. Now the bot is running 24/7, basically for free.
What I learned
At some point in the last year, I forgot how webhooks can make things extremely simple. I guess I was caught on the wave of either writing a ton of tools for the agents or using the CLI too much. Because I wanted to keep things simple from the beginning, I went with webhooks from the get-go. Now I have a better perspective. I think from now on I will think harder about what I use. I’ve always been someone who fights to implement the simplest solution, but I realized I am not that guy anymore — and maybe I should be.
Any code we write means we have to maintain it; the less, the cheaper. This project helped me remember that.
As for the voice integration: I know we now have many omni models, but to be honest the well-proven STT models work very well — why would I implement something different? The fact that we can transcribe a voice note and feed the LLM using text means we can use any LLM, meaning we can take advantage of the best of all worlds.
The project was more interesting than expected.